Sarah Getz
Tightness around the neck and shoulders is a common modern woe. Sometimes it’s the fault of poor posture: if we work online or spend too much time gazing down at our device, we often end up with a slouched, rounded spine and forward head position. Sometimes it’s the residue of chronic stress or anxiety (like, the entirety of 2020). Unfortunately, tightness in these muscles isn’t just painful, but can interfere with our ability to move and breathe freely. It’s helpful to gently mobilize these areas regularly so you feel better and have movement options – whether it’s reaching to scratch that hard-to-get itch between your shoulder blades or stretching high to sneak the cookie jar off the top shelf.
Here’s a few simple tricks:
1) Shrug It Off
Shrugging – plain or fancy – is a fabulous way to mobilize your shoulders and ease your neck.
Sit or stand upright. Let your facial expression go slack. Relax your jaw, maybe open your mouth. You’ll look a bit silly. That’s part of the fun! Then, bunch your shoulders high up the sides of your neck, crimping them in close. You’ll feel contraction in the top shoulder and side neck muscles. Then, keeping your shoulders hiked high, move them backwards so your shoulder blades pinch together (you might be making a sillier facial expression at this point). Continue to massage your shoulder blades lower, sliding them down either side of your upper spine. Then (this is the nice part) totally let your shoulders relax. Take a breather. You might need to moan or groan!
When you’re ready, try shrugging again, more fluidly – no starts or stops in the movement – as if you’re drawing slow circles with your shoulders. Don’t worry how big the circles are. Notice the intimate connection between your neck and shoulder muscles. Notice that you’re alternately contracting those muscles, then releasing them, which helps them relax. As you become a connoisseur of shrugging, play with variations: mobilizing one shoulder at a time, or experimenting with ‘reverse’ shrugs.
2) The Magic Four Shoulder Stretches
These are so yummy, I do them daily. Try them first with your right arm on top (‘dominant’), then do the stretches again with your left arm dominant. You’ll notice a huge difference between arms – that’s natural, reflecting the way you’ve used your arms your whole life. As with all stretches, respect your natural range of flexibility. Never push or force. We don’t need to be Gumby; we just want to increase our range a bit, so we have movement options. A good general rule of thumb: a little bit of movement in a lot of places is better than a lot of movement in just one place.
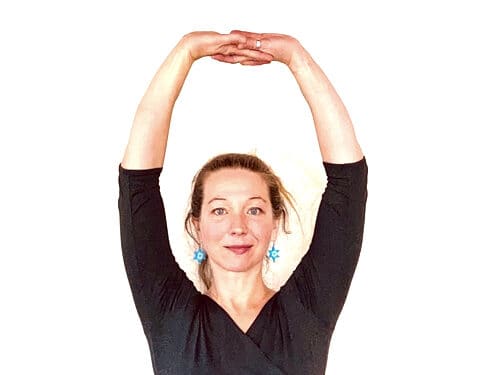
Upward Hands: Interlace your thumbs and fingers, crisscrossing them all so the right hand is dominant (your right thumb will be over your left thumb). Turning your palms away from you, stretch up toward the ceiling. It’s fine if your arms are bent or angled out in front of your face rather than straight up. Allow your shoulder blades to slide gently up your back, following the reach of the arms. Then, curl your chin down toward the top of your chest to release the back of your neck. Take a few breaths into whatever you feel. It might be nice to make micromovements with your head, rolling it slightly side to side.
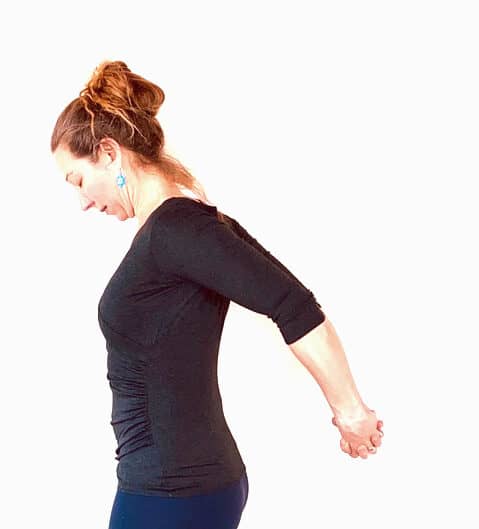
Clasped Hands: Reaching behind your back, clasp your hands together, right hand dominant, palms facing each other. If this is awkward, hold a towel or belt between your hands. Gently squeeze your shoulder blades, upper arms, and elbows closer together. if your elbows are locked (overly straightened, i.e., hyperextended), deliberately bend your arms. If you’re feeling too much stretch, rest your knuckles on your back. Again, try curling your chin to your chest to release your neck. Are you breathing?
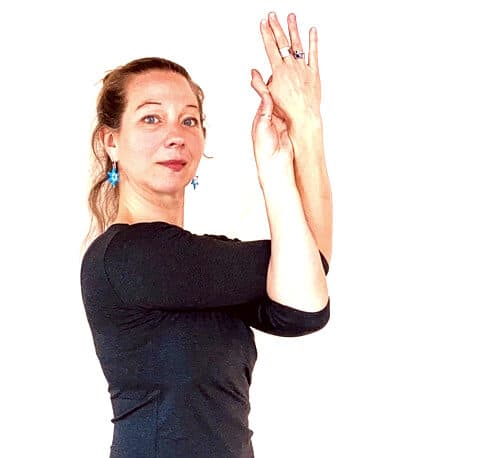
Eagle Pose Arms: This one is super tricky! Bend your arms at easy right angles with hands up, and bring them towards each other in front of you, elbows at about shoulder height. Try to cross them, hooking the right arm over the left arm. If this is awkward, don’t fret: instead, cross your wrists and press the backs of your hands together, or hold a towel between your hands. If you’re able to hook, try wrapping your forearms close and bringing your hands to touch. Relax your mouth and jaw (notice how your facial muscles sympathize with neck and shoulder sensation!). As a variation, slowly revolve your head to one side, gently spinal twisting your neck. Take a few breaths, then switch sides. Alternately, you can gently tilt one ear toward the top of that side shoulder, side bending your neck. Definitely keep breathing!
Cow Face Pose Arms: Hmmm … maybe this is the super tricky one? You’ll probably need a towel or belt. Reach your right arm up, then bend it, so your hand tucks down towards the back of your neck. Your right elbow will more or less be pointing towards the ceiling. Then, bring your left arm against your side. Bend it and try to reach up your back towards your shoulder blades. That left elbow will more or less be pointing towards the floor. If you can, catch your hands together. If not, dangle a towel from your top hand, and “walk” your bottom hand up the towel. Don’t strain or force! Notice your reaction – if you’re frowning, grumbling, or getting judgmental, ease off and keep the stretch modest and accessible. When in doubt, do less.
When you’ve finished with these four stretches, holding them for several breaths each, gently loosen and release your shoulders with a few soft shrugs. Then, do the stretches once more with the other arm dominant.

3) Let your breath “place” your neck and shoulders
While moving and stretching are useful, they’re not the only ways to find release. it’s equally important to let your neck and shoulders find the natural support of your inner body.
Rather than trying to “correct” the placement of your shoulders (like, pulling your shoulders down your back and pinning them into place, which is actually not healthy for the shoulder joints) what if you could feel your breath supporting the lightness and uprightness of your upper body?
Here’s an experiment:
– Sit on a chair, in good posture.
– Let your arms fall naturally at your sides or place your hands on your lap.
– Take a few easy breaths.
– Imagine, as you breathe, that your lungs are like two balloons. With every inhale, your lungs expand three dimensionally – inflating your back, sides, front, as well as up and down. With every exhale, your lungs naturally empty, and relax.
– If comfortable, let your breath get a wee bit slower and deeper. Can you imagine your shoulders floating on the rise and fall of your breath, like leaves on water? Can you imagine all of your bony structures – ribs, chest, neck and head – also floating, gently suspended, supported by the movement of your lungs?
– Take this experiment with you as you stand up and move on with your day. Rather than attempting to fix your posture by grabbing and gripping with muscles, try allowing your upper body to rest into its natural place, draped around the inner buoyancy of your breathing
4) Lie Down and Chillax
Resting like this is a great gift to give yourself in the middle of a busy day. Set a timer on your phone – even five minutes will help you feel better.
If you’re still struggling with neck and shoulder tension, one of the kindest things you can do for yourself is get your head out of gravity! Lie down on the floor. Use a blanket to create a low pillow for your head and neck, elevating your head a few inches so your forehead is slightly higher than your chin. Your legs can either be long and loose or bent with your feet on the floor – whatever feels best. Then, expand your arms out wide to either side, resting them heavily on the floor, palms open towards the ceiling. It’s fine if your arms are bent, but make sure they rest on the floor. Gently scoop your shoulder blades underneath you to enhance the opening of your chest, but let your upper back stay wide. Release your jaw, close your eyes, and invite your body to melt into gravity’s pull. Enjoy. (Don’t blame me if you fall asleep!)
Sarah Getz is a yoga teacher and writer. For information about her online offerings, visit www.yogaatspace.com